Friday, April 30, 2010

Zva Creative Design Team Blog Hop

One of the things on my to do list that didn't happen this week was to participate in the Zva Creative Design Team Blog Hop. The DT team posted 13 sketches and I hoped to do a list several but managed to do only this one at the very last moment. Kim Huhges made the sketches and the sketches themselves are little pieces of art.

I adhered the crystal flowers to the vellum and cut out. They turned out beautiful like my gorgeous niece Hadas.


Supplies: cardstock (Recollections, Core'dinations), lace paper (Basic Grey), chipboard and stickers (Basic Grey), crystals (Zva Creative), border punch (Martha Stewart), tag punch (Martha Stewart)

Edited to add:
Here is another layout that I made in40 minutes or so. It is still Thursday somewhere, right? LOL
The white cardstock is not part of the layout. I used this sketch featured on Becky Olsen blog. I used the capital L monogram for the title and used the small l to embellish the canvas tag.

Supplies: cardstock (Paper Studio), patterned paper (Pink Paislee, GCD Studios), chipboard (Basic Grey), canvas tag (Basic Grey), crystals (Zva Creative), border punch (Fiskars)

Thursday, April 29, 2010

Dimensional Details - week 4 and other not related notes

It was a busy busy week. The preparations for the annual ice skating show are in full swing. Lila and me are spending the whole weekends at the rink. She also took a lot of private lessons preparing for her test ice skating test last Sunday. She tested in 4 categories and passed 3 of the. Still need to work on her pre-juvenile moves in the field. It is tough!

I know you wanted to see it so here is Lila dancing Canasta Tango:

Canasta Tango test from Maya Oren-Dahan on Vimeo.


I completely skipped the week 3 of Dimensional Details and managed to do only one layuot for week 4. It was a bonus assignment based on the sketch by Trina McClune The left part of her layout had about 80 small pictures. My version has only 20 but it is still a record for me. As Trina, I sanded the edges of several pictures and raised them. I used again the old DCWV Once Upon a Time paper pad. The title is cut using Qiuckutz Revolution.


Supplies: cardstock (Wausau Paper), patterned paper (DCWV), chipboard (DCWV), die cut machine (Quickutz), journaling tag (Making Memories), border punches (Fiskars), glimmer mist (Tattered Angles), ink (Hero Arts)

Few other things that I wanted to share for a while:

1. This beautiful video about recreating ballet tutus:


LOVED it! Thanks Michelle for sharing!

2. I am following new blog called Koupon Karen If are are looking to save some money and don't mind printing and cutting coupons this blog is for you. Karen is having a giveaway of Spiral Photo Books. It is closing today but you still have time to enter.

3. Did you see Sara's stamp carving tutorial? Check it out!

4. And lastly a small request to my dear readers. I try to visit every person that leaves me a comment to say thank you and hi. I don't have a way to reach some of you that have private blogger profile and don't leave email. Especially if you are asking a question or asking me to visit your blog.

Wednesday, April 21, 2010

Yellow and blue

Two new layouts from yesterday. The first one is based on Twisted Sketch 46. The twist for this sketch is "touch". I made my layout about the touch of yellow in my backyard. Three little tags on the left and the date tag are made with Fiskars squeeze corner punch.

Supplies: Cardstock (Paper Studio, Bazzill), patterned paper (Cosmo Cricket, Hambly Screen Prints), letter stickers (Doodlebug), flowers (American Crafts), pearls (KaiserCrafts), corner punch (Fiskars), ink (Colorbox), souffle pen (Sakura), flower sequin (unknown)


This layout was prompted by Israeli Scrapbooking forum. To celebrate the Israeli Independence day the challenge was to make a project using only white and blue colors. Right away I though about the pictures from the airport but when I checked my picture folders I found only this picture from 2004. Mental note to myself - take pictures next time we are going to visit.
First I used the blue die cut paper as a mask for the glimmer mist. If you look closely you will see the pattern on the white cardstock. I than cut the die cut paper and made a gate. The bunting is made from white cardstock that was brushed with glimmer mist.


Supplies: Cardstock (Recollections), diecut paper (Anna Griffin), lace borders (Doodlebug), journaling tag (Anna Griffin), letter stickers (big - The Paper Studio, small - Making Memories), punch (Martha Stewart), glimmer mist (Tattered Angles), blue pen (Sakura), ink (Colorbox)

Tuesday, April 20, 2010

Fiskars border and corner punch tutorial

During the month of April Lead Fiskateer Kelly-Jo is sharing inspirational tips from Fiskateers. Today was my turn to share a layout I created using Fiskars border and corner punch Read Between the Vines. You can see the tutorial here. I am also posting it below with bigger pictures.


1. Cut 1" strip of cardstock. This is going to be a stencil so the color is not important. Punch one side using only the border punch. Do not punch the corners. Trim about 1/2" from the end of the strip (see the pencil line) and punch from the other side. [ignore my dirty crafting mat, as long as it is not sticky I don't bother to clean it]


2. Use the punched strip as a stencil to ink the cardstock. Continue to move the strip and ink as desired.


3. You just made a custom background. That works best with smooth cardstock.


4. Decide on picture placement. Select one or two pictures and create a picture frame using the punch. Remember that the punch works in whole inches increments. My pictures are 4"x4" with 5"x5" yellow frame and 3"x3" with 4"x4" pink frame. Adhere 10"x9" vellum mat, the tag that will hold the title and the pictures. The picture in a pink frame is mounted on a piece of thick chipboard for added dimension.


5. Add the title, the journaling strip and the tiny flowers. The flowers were left from punching the frames. Pay attention that there are 2 different sizes of flowers. I used the bigger size.

Admire your layout!

Thursday, April 15, 2010

Scrap That Baby - Prompt 3: What's in a name?

Today the new Scrap That Baby challenge is up! Today's prompt is What's in a name. I decided to make a layout about my oldest daughter Lila. Since she has a Hebrew name it just felt more appropriate to write the journaling in Hebrew. Her name means lilac in Hebrew and that's what defined the color scheme. After I submitted my DT layout, Ofir looked at the layout and said - your Hebrew sucks. I couldn't argue since Hebrew (or English) is not my native language. With Ofir's help here is an improved version of the journaling.

Supplies: Cardstock (grey - unknown, purple - DCVW), patterned paper (GCD Studios, Anna Griffin), tag (Heidi Grace), raindots (Cloud 9), paint (white - Honig, purple - Making Memories), grungeboard (Tim Holtz), chipboard (Heidi Grace), rhinestone (Martha Stewart), glimmer mist (Tattered Angels), ink (Palette), flower punch (EK Success), circle punch (EK Success), border punches (Fiskars and Martha Stewart), USX (Fiskars)

For my blog readers that don't read Hebrew the journaling says: "Lilach, before you were born we thought about how should we name you. We made a list of the names we loved and waited to see who are you. It took us a week with you to find out that you are Lilach, a gentle and fragrant flower. When we moved to United Stated we found out that nobody here can pronounce your name, so we changed it to Lila (at least your are not Phil like daddy), but only in English. For us you will always be our Lilachi."

The mention of Phil is our internal family joke. My husbands name is Ofir, but for some reason people here think his name is Phil, that sounds like elephant in Hebrew.

I made the flowers using this tutorial. I had some purple paper scraps that I used for the flowers. The paper was one sided, so I sprayed the back side with Deep Plum glimmer mist for one flower, the second flower was misted after it was already done. The English title letters are misted as well. The little tag was cut using Fiskars USX.


I used white and purple acrylic paint to create a frame around my pictures. After all embellishments were in place I felt that something is missing. I covered the pictures with paper and sprayed the top of the layout with Deep Plum glimmer mist.

I am going to check the rest of the DT layouts - they look amazing. I have two more kiddos, so I need more inspiration for their name layouts. And don't forget to submit your layout for the challenge! It doesn't have to be new.

Wednesday, April 14, 2010

Girly layouts

Two more layouts from last week. The first one is inspired by Janna's layout. I loved how she placed 3 vertical pictures on one layout and basically scraplifted the whole design. Thanks mom for sending me the pictures of my adorable niece.
Supplies: Cardstock (Core'dinations), patterned paper (Studio Calico, Jenni Bowlin), transparency (Hambly), chipboard letters (Pink Pasilee), cardstock stickers (Jenni Bowlin), stickers (Making Memories), brads (CTMH, Making Memories), button (Making Memories), ink (Colorbox), parchment paper, staples


This layout was inspired by Nic's layout from Dimensional Details handouts. This is really bad picture of Lila getting ready for her choir concert. I still wanted to scrapbook it because she looked so cute in her new white blouse and black skirt. I printed the picture in sepia and used a muted and vintage color scheme.


Supplies: Cardstock (Wausau paper), patterned paper (7 gypsies, Amanda Johnson, Jenni Bowlin), sticker letters (Collage Press), metal frame and brads (unknown), flowers (Prima), jewels (unknown), glaze pen (Sakura), ribbon (unknown), distressing tool (Heidi Swapp), corner punch (Fiskars)

Saturday, April 10, 2010

Dimensional Details - week 2

The week 2 of the class is about creating custom backgrounds. The first layout I made was for 30 minutes challenge. I took me 55 minutes but that included agonizing over the title and looking for the alphas with four letters E.
The picture is mounted on a thick piece of chipboard for the dimension. The little frame was cut out of Hambly overlay and burned on the edges.
Supplies: Cardstock (Paper Studio), patterned paper (My Mind's Eye, Webster's Pages), stickers (American Crafts), journaling stickers (Making Memories), transparency (Hambly), crystals (Prima, Zva Creative), ink (Colorbox)

This layout has a lot of curling and inking. The white cardstock is 9x12 and the layout elements are slightly bigger. For now I am keeping it in 12x12 page protector but maybe I will cut the page protector and make it smaller. The corners of the kraft cardstock are rounded with Fiskars squeeze corner punch and the corners of the white picture mat are rounded with a smaller version of the same punch.
I used Heidi Swapp butterfly mask with gold glimmer mist on the background. It is almost invisible but that's ok. I used black glaze pen for the frame around the picture.


Supplies: Cardstock (Recollections, Paper Studio), patterned paper (Jenni Bowlin), stickers (Making Memories), souffle and glaze pens (Sakura), mask (Heidi Swapp), flimmer mist (Tattered Angels), distress ink (Ranger), corner punch (Fiskars)

Can you tell that I LOVE this class?? I have a bonus handout left from this week. Can't wait to dig in!

Dimensional Details - week 1

I told you there will be more curling! Here is my layout for the week 1 assignment.


Supplies: Cardstock (Recollections), patterned paper (DCWV, Basic Grey), lace border (Pink Paislee), rubons (Pink Paislee), chipboard letters (Pink Paislee), chipboard crown (DCVW), letter stickers (Making Memories), ink (Colorbox), paint (Plaid, Honig), border punch (Martha Stewart), corner punch (Fiskars), butterfly punch (Fiskars), mask (Heidi Swapp)

Thursday, April 8, 2010

Pantry is organized!


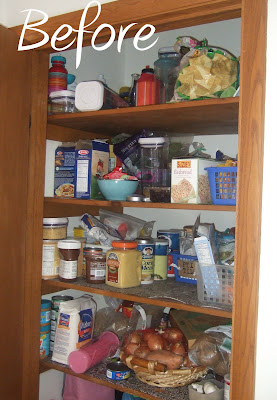
Few weeks ago at my local MOMs chapter meeting I won a gift certificate to Organized Nest. Who can't use 2 hours with professional organizer?? I certainly could. My kitchen pantry gave me a headache since we moved. I was excited to have a big kitchen pantry but my organizational system from the previous kitchen did not work at all. The shelves very too deep and soon it became a huge mess as you see from before picture.

And here are the results. Jean helped me to sort everything to the bigger baskets and she brought with her the cute baskets with handles. I could put them on the upper shelf and still reach them when needed.


Thanks Jean! Now I just need to tackle the rest of the house LOL

Orange Power

It is time for Twisted Sketch #44. Guess what was the twist for that one? Yep, orange. For me is was easy. Orange = Fiskars :) Finally I had a good excuse to pull out the picture of Nifty Fifties from San Antonio. Love the results! If you are looking for me I am in the front row wearing black and not wearing sun glasses. I am 9th from the right.

I used my Mint Condition squeeze punch to make the leaves. The chipboard is inked and covered with layer of glimmer mist.

Supplies: Cardstock (Core'dinations), patterned paper (Studio Calico, Pink Paislee), tag (Anna Griffin), orange letter stickers (Basic Grey), black letter stickers (EK Success), chipboard (Maya Road), ink (Maya Road, Colorbox), flowers (Heidi Swapp), soufle pen (Sakura), raindots (Cloud 9), pearls (Zva Creative), punch (Fiskars), glimmer mist (Tattered Angels)

Tuesday, April 6, 2010

Adorable U


I used Pencil Lines sketch that I saw on Jenni Bowlin Inspirational blog for this layout. All products except the pearls are from Jenni Bolwin May 2009 kit. The sweet girl in the picture is my niece


Supplies: Patterned paper (Jenni Bowlin), journaling cards (Pebbles Inc.), letter stickers (Basic Grey), punches (Fiskars), pearls (Zva Creative)

Posted by Picasa

Monday, April 5, 2010

Practicing my curling technique

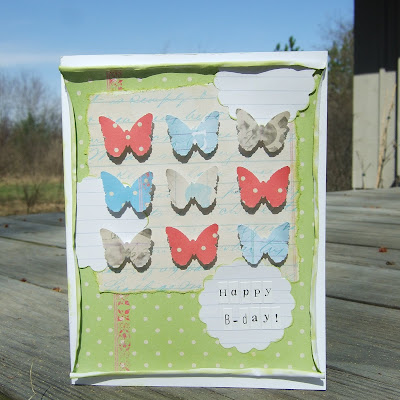
Not curling like in Winter Olympics but curling like in paper curling. This is a new technique I learned from Nic's class Dimensional Details. After I read the week 1 lesson I decided to use this technique on this spring card I was planning to do. The card is inspired by Tuesday Trio challenge. It screams spring for me with bright colors and butterflies.


Supplies: Patterned paper (Creative Imaginations), butterfly punch (Martha Stewart), scallop punch (Fiskars), ink (Colorbox)

Sunday, April 4, 2010

Dimensional Details - pre-class assignment

I just couldn't miss it. Dimensional Details class at BPS by Nic Howard looked like something I really want to do. The sneak peaks of the layouts from the class were too gorgeous. I signed up. It is 12 weeks class so expect to see lots and lots of layouts. This one is from pre-class assignment. You can see Nic's page on the here. I decided to make a title page for my Project 12 album. I loved the idea of using a block of journaling that repeats itself as a background but couldn't find anything that fits so my background just says 1 year 12 months 52 weeks 365 days 8,760 hours 625,600 minutes 31,536,000 seconds...


Supplies: cardstock (Paper Studio, Recollections), patterned paper (Creative Imaginations, Martha Stewart, Anne Griffin), clocks (Heidi Swapp, Maya Road), chipboard tag (Heidi Grace), numbers (Tim Holtz), die cut flourishes (K&Co), flower punch (EK Success), corner punch (Fiskars), buttons (Making Memories), rhinestones (Martha Stewart), ink (Brilliance), souffle pen (Sakura)

Thursday, April 1, 2010

Scrap That Baby - Prompt 2: On the day that you were born

Prompt 2 is up at Scrap That Baby! That was the first prompt for the new Design Team. I chose to share a layout I made last year that is one of my most favorite layouts.

Go check what other DT members did - very inspiring! Share your take on the prompt by April 13th and you can win a prize from our first sponsor In A Scrap Creations.

P.S. Elinor asked me why I did the journaling for my mini album in English. That's true that English is not my native language but for the last 6.5 years we live in US and my kids are fluent in English but unfortunately don't read Hebrew very well. On some layouts I choose to journal in Hebrew (or Russian on very rare occasion) but it is more natural for me to journal in English. At least now :)