Showing posts with label silhouette. Show all posts

Saturday, August 27, 2016

Happy First Day of School and saying good buy to Scrappy Hands

Hello my dear blog readers! It looks like another month passed without me visiting here. My excuse is that I've been busy. We had a very busy month filled with travels, family visit, graduation party and we are getting ready to say good buy to Lila as she is heading to college, eager to start her independent life.

But I still have a high school sophomore and a third grader and for them September 6th will mark a beginning of another school year.
I made a simple "Happy First Day of School" card to mark the occasion. I was inspired by the latest Scrappy Hands challenge. It says "Stationary" in English but I would translate it as "Writing Instruments"


I used a pencil sticker from the "K & Company" sticker sheet. I wanted to keep it simple so I designed my sentiment in Silhouette software, cut it from vinyl and used cardstock layers with small offset underneath the vinyl.


I used foam tape under the words for more dimension.

Sadly, this challenge is the last Scrappy Hands challenge. I enjoyed being part of the Design Team and working with these talented ladies. Stop by the blog and take an look on their take on out last challenge.

Happy new school year to everyone!


Sunday, May 29, 2016

Good luck and symmetry

Hello my dear blog readers!

I am a little late posting this (more like a week late) but in this case it's better late than never.

I made this colorful card for the Scrappy Hands Symmetry challenge.


I printed the hamsa design on a piece of cardstock and colored it with Faber Castell markers.


The sentiment says Mazel Tov in Hebrew and is cut from glitter vinyl. I added few dots with gold smooch ink to the design.

It took me quite some time to finish the coloring but I love how it turned out!

New Scrappy Hands challenge is already out but there are still 12 days to participate in the symmetry challenge. Link your work right here. We would love to see it!

Wednesday, May 11, 2016

Scrappy Hands challenge 64 - Flag


Hello my dear blog readers. Today I am sharing a layout I made for the Scrappy Hands Flag challenge. I used the pictures from the Celebrate Israel Parade in NYC that we marched in with the Israeli Scouts 2 years ago. 


I kept the layout simple by making a background of blue pennants and adding three flags under the pictures.


The titles and the Israeli flags are made from vinyl with my Silhouette Cameo. So easy!

Check what other DT members made for this challenge on Scrappy Hands blog.

Monday, April 25, 2016

Spring birthday card - Scrappy Hands #63

Hello my dear blog readers! I had busy two weeks filled with roller derby, college visits, Passover and orders. I also had some gifts to make, one of them for a little girl from Eli' class. I wanted to make a sweet girly card and it worked perfectly with the latest Scrappy Hands Spring challenge.


I made a tri fold card with pop up butterfly. I designed and cut the card with Silhouette Cameo and used glitter vinyl to decorate the butterfly wings. The patterned paper is by American Crafts.


The card opens to reveal the birthday message.


The card came with the birthday gift - personalized storage container. I love this container - it has a removable tray and a carrying handle - perfect to store craft supplies or small toys.


I filled it with pretty stickers and washi tape. What 8 year old girl would no like this gift?

Check what other DT members did for this challenge and share your take with us. Let me know if you do!

Sunday, April 10, 2016

Baby cards

Hello my dear blog readers!
Today I am sharing two cute cards I made for the latest Scrappy Hands challenge. 


The challenge theme is "Babies" and what can be more adorable than cute little onesies?? I used this card I saved to my Pinterest board as an inspiration.

I stamped the onesie from the Fiskars baby stamp set and colored it with Faber Castell big brush markers.

Supplies: stamps (Fiskars), ink, (CTMH), markers (Faber Castell), paper (Lil' Davis), twine, jewels, Silhouette Cameo


The two layered banner is made from paper scraps in pastel colors. I used a glue pen to attach the twine and finished with tiny sparkly stars and a sentiment cut from vinyl.

And while I was at it I made another one in different color scheme.

 Supplies: stamps (Fiskars), ink, (CTMH), markers (Faber Castell), paper (Lil' Davis), hearts (Heidi Grace), twine, Silhouette Cameo


Stop by the blog to see what other DT members did for this cute challenge and if you have your baby project to share with us, please do!

Sunday, October 25, 2015

Scrappy Hands Challenge 50 - Gold

Another two weeks flew by and it is time for another Scrappy Hands challenge


The theme is Gold so it was only natural to use some of the pretty papers from the Studio Gold collection by Teresa Collins.

 I used one of the gallery art postcard that I matted on a piece of matching cardstock.


I added some hand stitching with gold embroidery thread, a sentiment that I cut with Silhouette Cameo from gold vinyl and few sparking jewels.

Check the beautiful projects from other team members and share your take on the challenge with us.

Sunday, July 12, 2015

Time to celebrate - Scrappy Hands "Clock" challenge

Hello, my dear blog readers!

This is going to be a quick post. I just wanted to share a card I made for the Scrappy Hands new challenge. The theme is "clock".


I used some oldies on this one - Heidi Swapp chipboard. I also added a doily and few punched out birdies. The sentiment was designed in Silhouette Studio and cut from vinyl.


Stop by the blog to see how other DT members were inspired by this challenge and share your take with us.

Fave a wonderful week!

Sunday, April 5, 2015

Scrappy Hands Challenge #36

Happy Sunday my dear blog readers! The temperatures are slowly rising here in New Jersey and it finally feels like spring. I have a cute organization project to share with you today.

I planned to make this dry-erase countdown frame for few months now. I bought the frame back in February and it was patiently waiting for me in the pile of "random things I am going to use one day" on my desk.


That frame got lucky, because it worked perfectly for the new Scrappy Hands challenge. The theme is "Organize" and this little frame will help me to get organized for any upcoming event. Right now we are going to use it to count down days until spring break. My 1st grader can use some motivation ;-)


I designed the frame in the Silhouette Studio software and cut the design from vinyl. I used My Mind's Eye patterned paper for the the background.


And here is another one I made - that one to plan my blog schedule. Hope it will keep me on track :)


Check what other Design Team members did for the challenge and share your take. 

I am off to enjoy some sun and spring weather!


Saturday, April 4, 2015

Scrap It Girl April Challenge

Hello my dear blog readers! Thank you to all of you who stopped by my blog last week and commented on my Fiskafirend blog hop post! I really enjoyed reading your comments, keep doing that! :)

Today I am sharing another card, no washi tape this time, just few paper scrap and Fiskars punches.

I made this card for the April challenge at Scrap It Girl - black, white and one other color.

I picked few black and white patterns from my favorite Jenni Bowlin papers. She is one of my favorite manufacturers (so sad she stopped designing scrapbooking products) so I keep all my scraps.
I punched few circles in two sizes and added them to the card front.

Supplies: patterned paper (Jenni Bowlin), punches (Fiskars), Silhouette Cameo)

I used foam tape under the smaller circles. I chose red for my "one other color" and added a small red heart. The sentiment is cut with Silhouette Cameo from vinyl.


Check from other Design Team members did for the challenge and share your take with us right here. You have a chance to win a wonderful prize from Kimberly!


Sunday, March 1, 2015

Purim basket

It is hard to believe that today is March 1st. This winter is just refusing to give up and today we had to miss Lila's roller derby clinic because another snow storm decided to show up and mess with our plans.

But the calendar insists that we indeed reached March. March brings Purim and anticipation of spring. I immediately knew what I want to make for the Scrappy Hands box challenge - a decorated box for Purim or as we call it - "mishaloach manot".


I started with a wood box that I decorated with vinyl stickers cut on Silhouette Cameo. I filled it with sweets and added a paper tag with greeting.


Here are few more boxes I made as custom orders. Here the names are in Hebrew. Check what other DT members did for this challenge. Love how different all project are! What about you? Do you like to make altered boxes?

Monday, February 23, 2015

Altered container for magnetic letters

Happy Monday, my friends!

I hope your Monday is better than my. I took 5 wrong turns on my way to yoga today and eventually gave up. My phone is not charging anymore and my "to do" list is just getting longer and longer. The kids went back to school today after vacation week. From all great plans I made for this week we did literally nothing.

I am also late sharing this project I did for Scrappy Hands new challenge. But in this case, better late than never, right? The theme is "box" and I altered a chocolate powder container I kept for years.


My son finally started to show interest in Hebrew. He refused to speak Hebrew (the language we speak at home) till few week ago and I didn't insist. Lately he started to use Hebrew words and even asked for magnetic letters. This container was holding a bunch of English letters, I dumped them out, since he definitely mastered his English reading, and made a fun box for his Hebrew letters.


That's how the original container looked like. I covered it with a piece of patterned paper. I had to look in my stash for thin paper because I didn't want it to crease.


I cut the phrase "Eli's letters" in Hebrew with my Silhouette Cameo from vinyl. I also scatters single letters all over the front.

Eli loved his new container, I hope it will encourage him to use the letters more.

Check what other DT members did for this challenge right here.

This time we have a prize for one lucky winner - set of adorable stickers in Hebrew by Yael Yaniv.


Saturday, February 14, 2015

Class valentines and valentine shadow box

Happy Valentine! I hope the weekend is treating you well, regardless if you are celebrating today or not.

Valentine is not big in our house but we take very seriously the class Valentines project (at least I do). Every year I try to do something fun. This year I decided to make something with Eli that we already did with his big sisters years ago - heart shaped crayons.

Eli had the best time peeling the crayons and deciding what colors go where.


I posted more about this project on the Love My Tapes blog, Eli used their beautiful washi tape to write his "tos" and "froms".


This is what he gave to his classmates.


We did something different for the teachers. I designed a card with heart shaped window in the Silhouette software and cut it from white cardstock.  The heart-shaped crayon is added to the card with thick glue dot. The words on the card front are cut from vinyl with Silhouette Cameo.

Eli used Fiskars heart punches to decorate the inside of the card.

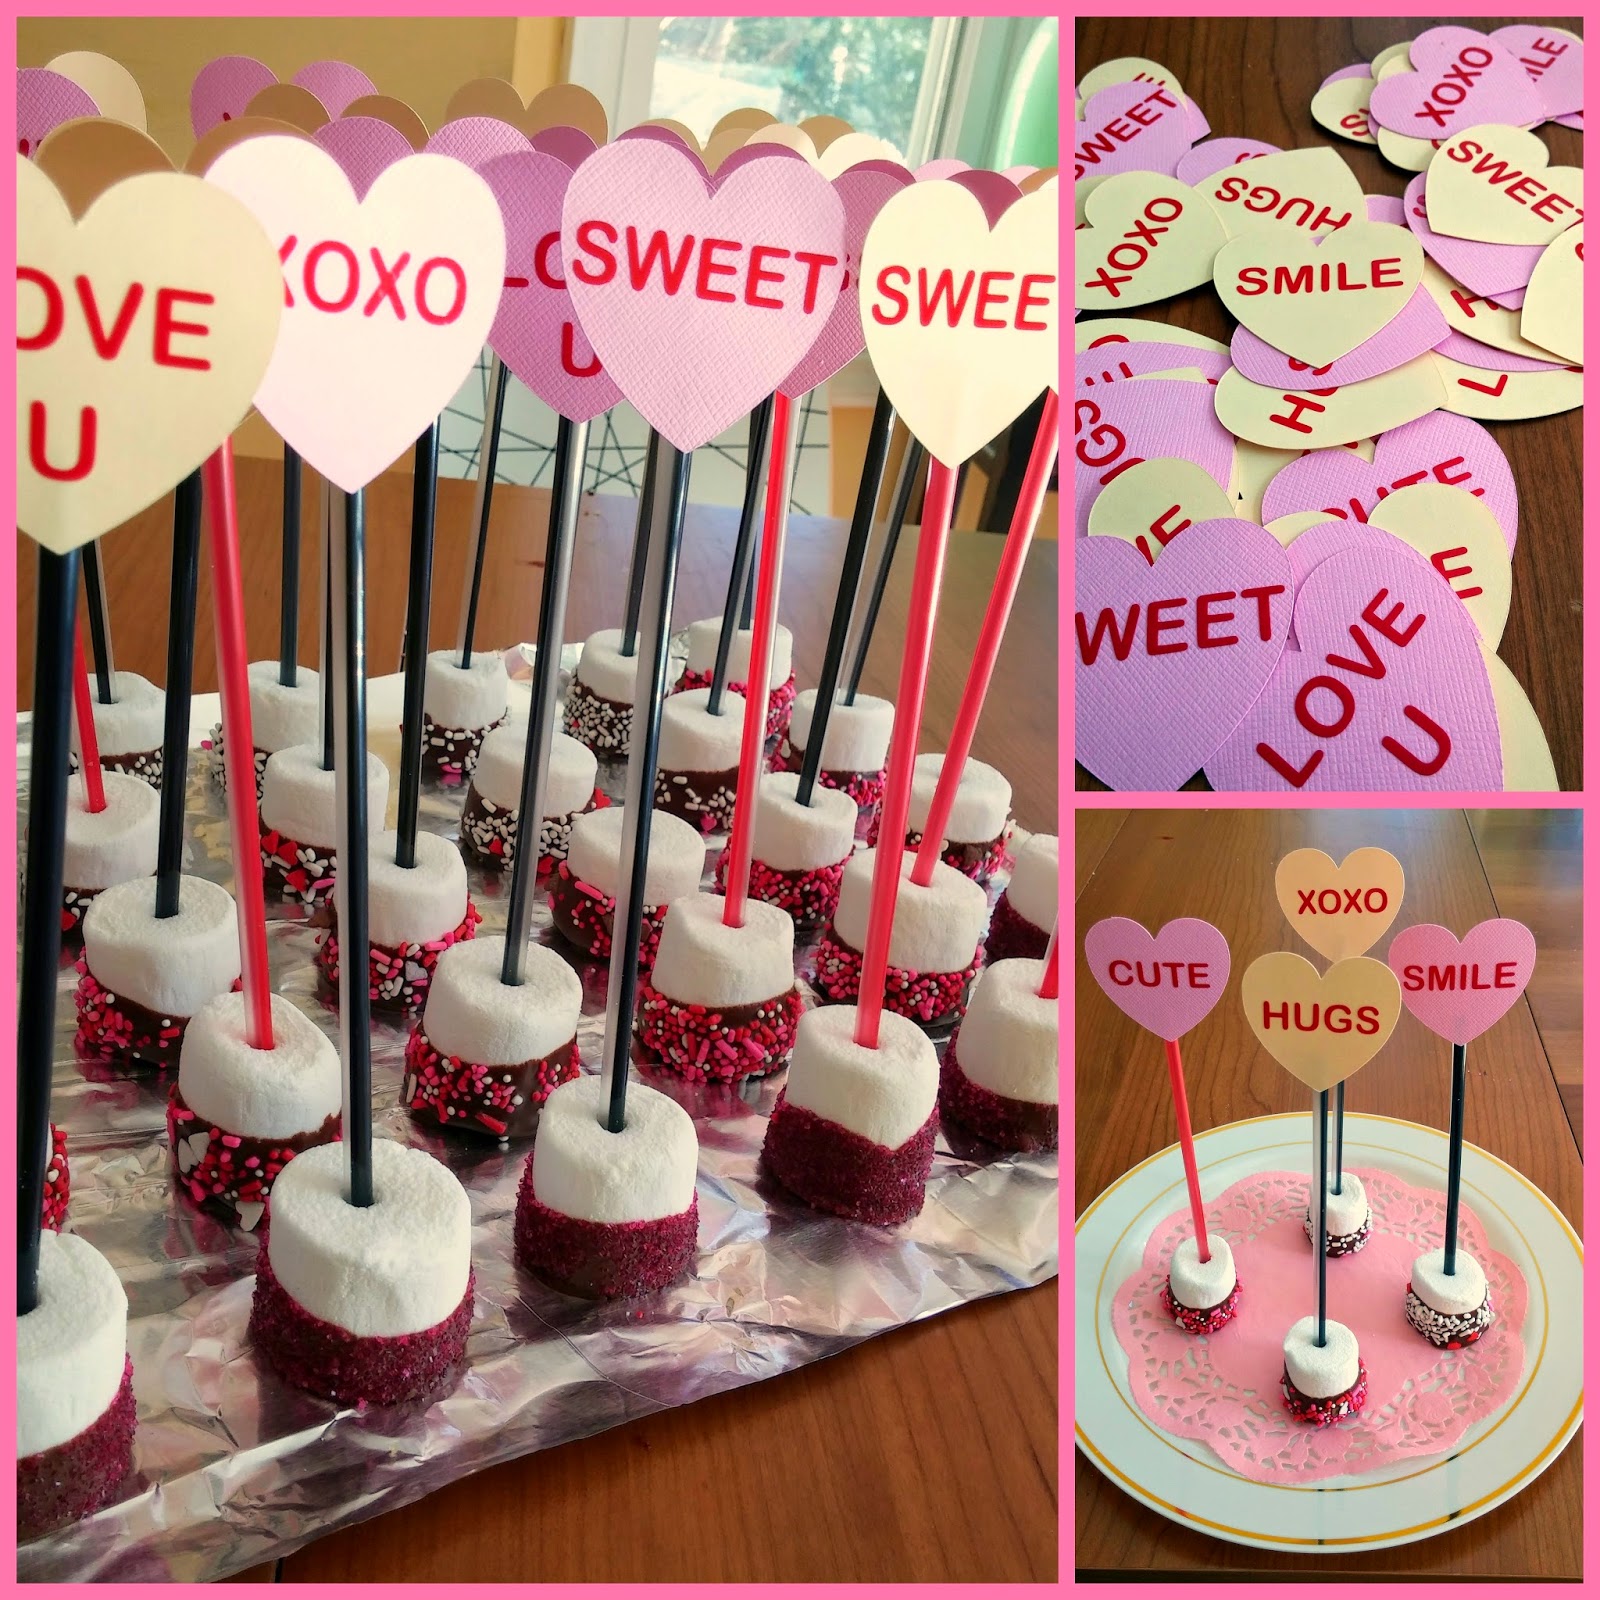
I made these chocolate dipped marshmallows for Eli's class party. I already made them once 2 years ago but this time I went with a simple topper - cardstock hearts and vinyl letters. Everything was designed and cut with Silhouette Cameo. The kids loved them!


The last project I am sharing today is a shadowbox I made for me. I used files from the new Digiplayground store to cut the hearts and the quote for the glass.


I used paper for the hearts and vinyl for the quote. I think a have a shadowbox addiction since this is the third one I am making in the last few months.


I made this shadowbox thinking about the Scrappy Hands "Family" challenge. It was posted last Sunday and tomorrow the DT will share another round of inspiration. Go take a look - fabulous projects!

To finish, I am going to share a picture of the rose I received from my husband :)


Thank you for stopping by and reading this long post :)

Monday, January 26, 2015

Can you say three legged downward facing dog?

I was looking though my 2001 photo album and found 2 photos from Lila's preschool taken at some kind of mommy and me activity. Not sure what exactly it was but we are on the mats, doing something that resembles yoga.

Yoga is on my mind recently, because few weeks ago I joined yoga studio and I have to admit it is not going so well. At least it helped me to come up with the title.

I used My Scraps & More Sketch #97 and Crate Paper "Oh Darling" collection with some DCWV papers thrown in a mix.

Supplies: patterned paper (Crate Paper, DCWV),  letter stickers (WRMK), big brush markers (Faber Castell), wood frames (Freckled Fawn), label stickers (Teresa Collins), metal dots (Heidi Grace), stamp (Heidi Swapp), heart punch (Fiskars), glimmer mist (Tattered Angels), Silhouette Cameo


I painted the wooden frames with Faber Castell markers and misted them with Glimmer Mist.


I used the Silhouette Cameo to cut the title and stamped few arrows under it.

Thanks for stopping by today. We are waiting for the blizzard to hit. The schools are cancelled for tomorrow. I hope to sneak some scrapping time! Stay warm!

Sunday, January 18, 2015

Sunbathing beauties - Scrappy Hands layers challenge

Happy Sunday my dear blog readers!

Today I am sharing another layout with pictures from out visit to the Japanese Gardens in IL. I made this layout for the Scrappy Hands Layers challenge and as in my last layout I used layers and layers of pretty paper from "The Far East" paper stack.

Supplies: patterned paper (DCVW), pearls, washi tape (Bo Bunny), metal clip (Maya Road), gold leafing pen (Krylon), vinyl (Oracal), Silhouette Cameo


I wanted to use the camera clip but I didn't like that fact that it is silver. Gold leafing pen to the rescue! I colored the clip to match the gold foil accents of the paper and the gold vinyl title.


I did some fussy cutting and finished with the page with pearls and a piece of washi tape that holds the paper clip in place.

Check what other DT members made for this challenge and share your take with us!