Showing posts with label kids crafts. Show all posts

Saturday, February 14, 2015

Class valentines and valentine shadow box

Happy Valentine! I hope the weekend is treating you well, regardless if you are celebrating today or not.

Valentine is not big in our house but we take very seriously the class Valentines project (at least I do). Every year I try to do something fun. This year I decided to make something with Eli that we already did with his big sisters years ago - heart shaped crayons.

Eli had the best time peeling the crayons and deciding what colors go where.


I posted more about this project on the Love My Tapes blog, Eli used their beautiful washi tape to write his "tos" and "froms".


This is what he gave to his classmates.


We did something different for the teachers. I designed a card with heart shaped window in the Silhouette software and cut it from white cardstock.  The heart-shaped crayon is added to the card with thick glue dot. The words on the card front are cut from vinyl with Silhouette Cameo.

Eli used Fiskars heart punches to decorate the inside of the card.

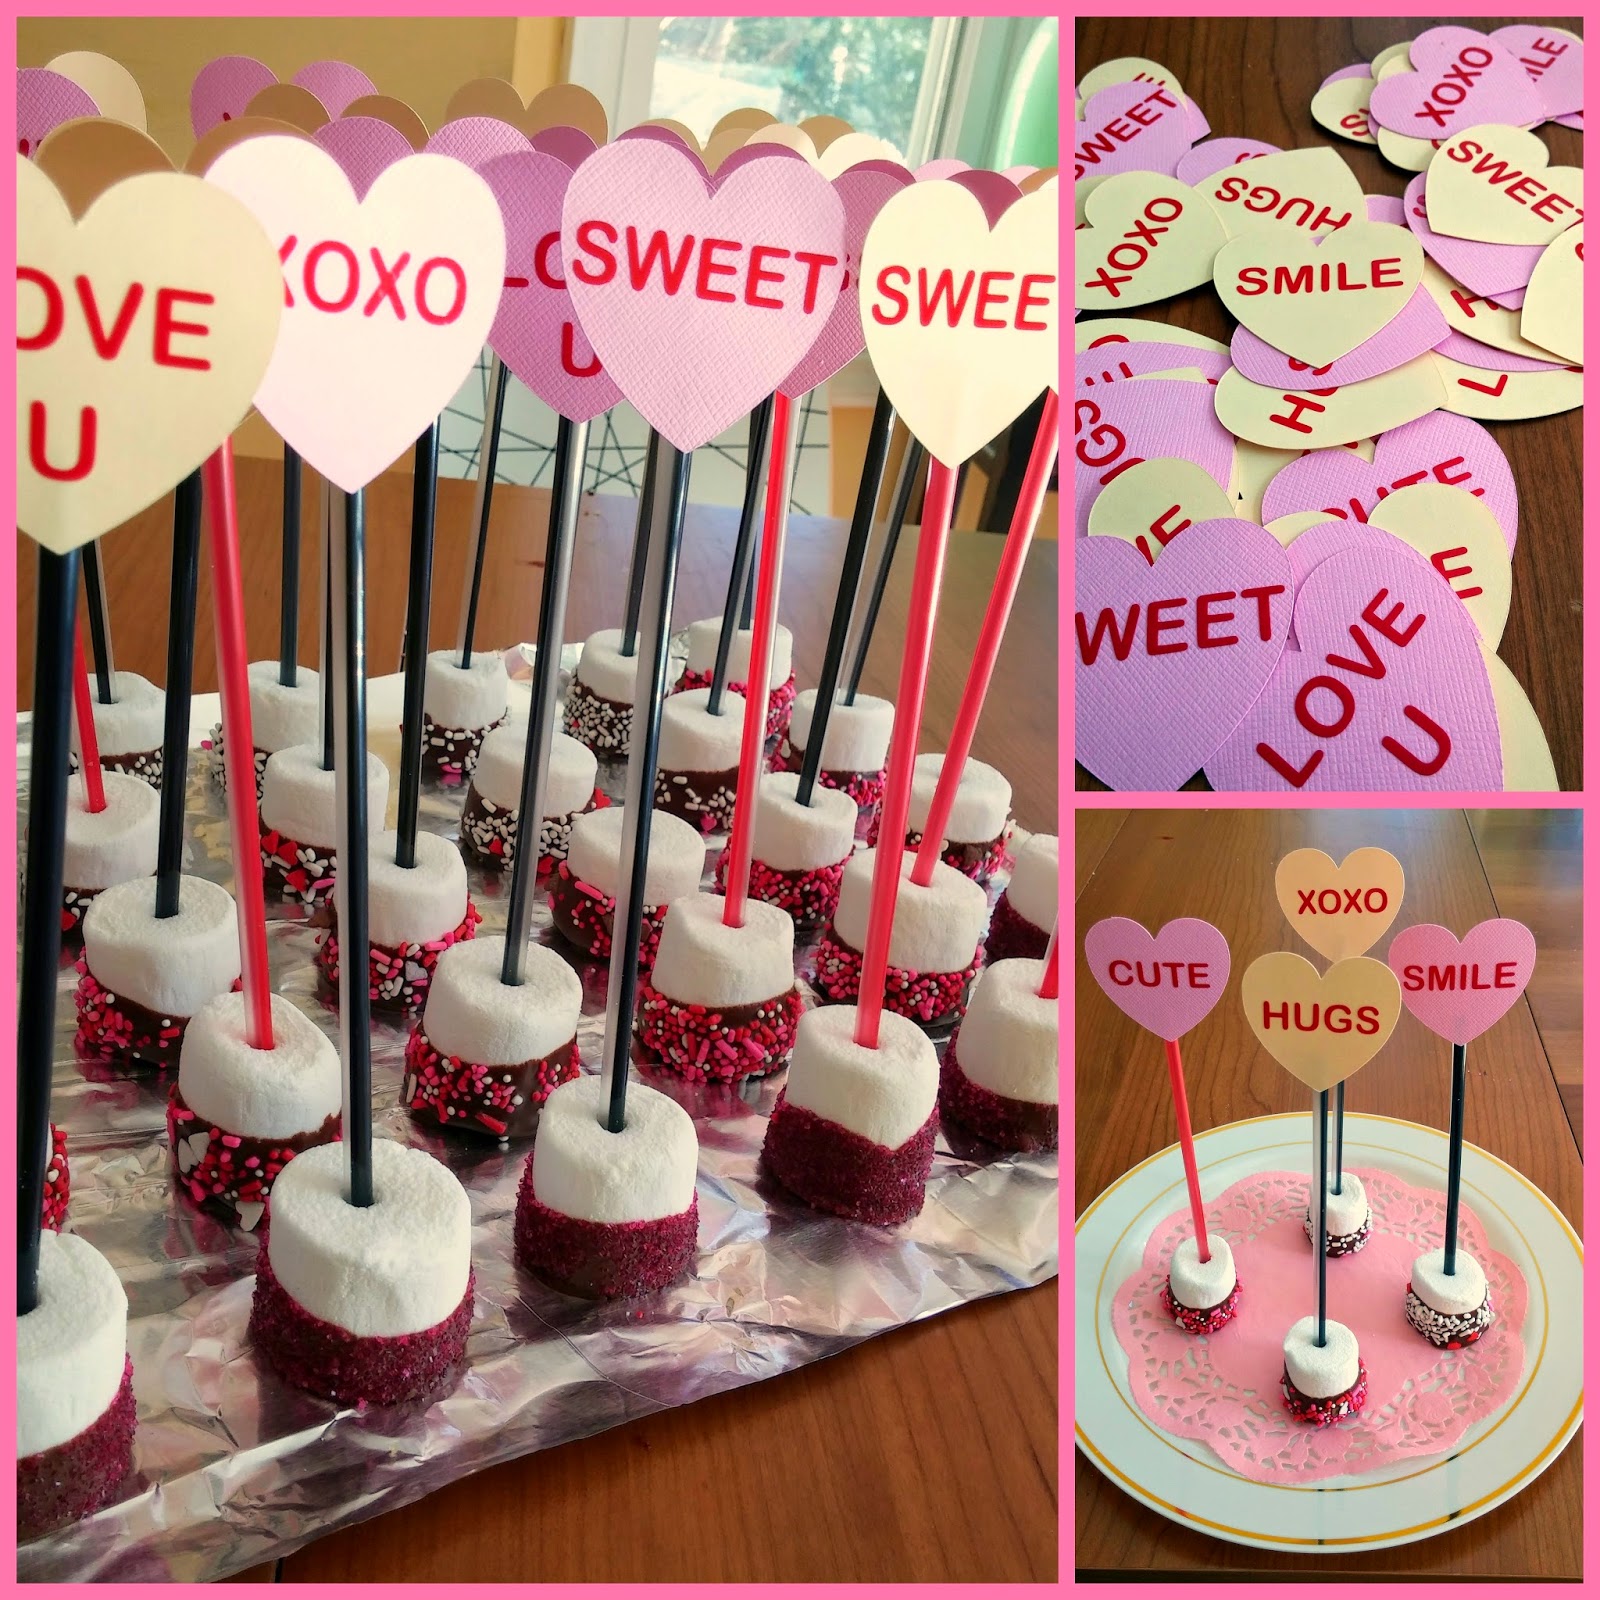
I made these chocolate dipped marshmallows for Eli's class party. I already made them once 2 years ago but this time I went with a simple topper - cardstock hearts and vinyl letters. Everything was designed and cut with Silhouette Cameo. The kids loved them!


The last project I am sharing today is a shadowbox I made for me. I used files from the new Digiplayground store to cut the hearts and the quote for the glass.


I used paper for the hearts and vinyl for the quote. I think a have a shadowbox addiction since this is the third one I am making in the last few months.


I made this shadowbox thinking about the Scrappy Hands "Family" challenge. It was posted last Sunday and tomorrow the DT will share another round of inspiration. Go take a look - fabulous projects!

To finish, I am going to share a picture of the rose I received from my husband :)


Thank you for stopping by and reading this long post :)

Thursday, May 27, 2010

Plantable seed flowers

Another project that I did last week but didn't have time to share. This time for the Fiskateers message board. As some of you know (and if you are a fiskateer I certainly hope you do know) I am a co-chair of the Kids Craft Committee. Every month my partner Amy and myself are sharing simple craft project for kids. The theme for our May projects was flowers. I was thinking hard and long (so long that I missed my deadline) what cute project I can do with a flower punch but nothing original and doable came to my mind. One day I stumbled across this tutorial for plantable seeded paper flowers. It was exactly what I was looking for. Instead of rolling the flowers we can punch them out. Much easier for kiddos. So here it is.

1. Punch out flowers from the paper scraps
2. Make a mixture of flour and water and brush the mixture on to the flowers. Sprinkle flower seeds.
3. Let it dry. The flower petals with curl up
4. Punch a hole in the middle of the flowers and use pipe cleaners for stems. Twist the pipe cleaner to secure the flower.

You can see my post on Fiskateers message board here and still join the challenge.

Ah, melts my heart away.

Thursday, March 25, 2010

Things on Wheels

As some of you know I co-chair the Kids Crafts Committee at Fiskateers message board. Every month Amy E and myself think about fun craft project to make with kids and post it on the message board. We also offer a prize to fiskateers that feel inspired by our projects and share their own creations with us. Thanks Fiskars for letting us to offer these prizes.

This month's theme was things on wheels. I found this cute project on Family Fun website and I thought it is perfect for our montly theme.
Ella and I made it with some minor modifications:

1. Paint the tube
2. Mark the location of the cockpit
3. Cut out the part of the cockpit marked with *. Cut out the other part leaving one side attached. Fold the flap up to serve as a seat back.
4. Punch out four 2" black circles for the wheels. I added another layer of the thin chipboard for stability. Punch four 1" circles from silver paper or aluminum foil. I used the leftovers from the wrapping paper. Punch out one 1" black circle for the steering wheel.


5. Assembly the wheels together, punch holes in the centers and insert paper fasteners (preferably plain and not your favorite fabric covered brads)
6. Punch the holes in the tube for the wheels and the steering wheel and attach. Decorate as desired.
7. 8. Play!

Tuesday, October 27, 2009

Happy Birthday Mom!


Yes, October is full of birthdays. First my little sister, mine birthday was 2 weeks ago and today is my mom's birthday. So, just wanted to say - Happy birthday!

I made this little accordion book for my mom. The girls wrote their wishes for grandma and I added the pictures (that we taken in the rain and fog). Mom, I was late shipping it so I thought I will post it here to let you know that it is coming.


Wednesday, October 21, 2009

Simplified Iris Folding Black Cat tutorial

I love iris folding! It is one of the first techniques I learned to do and I still like it. It is simple and creates a stunning results. Thinking about the Kids Crafts Halloween crop that Amy E and myself are planning for this Saturday at Fiskateers I had an idea for a simple iris folding Halloween project that will be suitable for kids.

There are plenty great iris folding tutorials on the web, I am not going to write another one, I will just show step-by-step how I did my project. I like to use the generic iris folding templates that I found few years ago on the web. Thy are created by Judy Headrick. Each pdf file contains the same template in different sizes. The number of edges will determine the number of the different types of paper that will be needed for the project. For the cat project I used the triangle template.

1. Download the template and print it.
2. Cut a 5"x7" piece of cardstock for the background. I used orange.
3. Cut a 2.5" circle opening using aUSX and a circle shape template in the lower part of the cardstock piece.

3. Attach the cardstock with the opening to the template page face down using temporary adhesive. Triangle template page gives 4 sizes of triangles. When you select a template make sure that the template is larger than the opening. I used the largest triangle. Center the iris as you wish. I put the iris slightly off center. Transfer the numbers on the template that are not visible to the visible part. See the next picture.

4. Choose 3 patterned papers or cardstock to use. I used different types of black - some printed paper from an old paper pack, some Bazill bling and some shiny paper that was a CD envelope in it's former life. Cut few strips of each paper 1/2" width.

5. Create a key. You can skip this if you know what are you doing, but if you work with kids it is nice to have a key. Mark 3 sides of iris with different signs. I put circle, asterisk and star. Glue 3 square samples of the chosen papers and mark them with a selected sign. See next picture.

6. Apply adhesive around the opening and start covering the stripes in the pattern with corresponding stripes of paper. Start with the lowest visible number. Remember that that the paper goes face down. If the iris is not in the center like in my example, some of the numbers will be missing. It is ok. Continue from the lowest to the highest number applying adhesive where needed to secure the strips. That's where the simplified part comes in. In traditional iris folding you use pattered paper or origami paper and you fold each strip. To make it easier for the kids we are not folding the paper. As a bonus we can use cardstock and thicker patterned paper.
7. Continue till you are done and only one triangle is left uncovered.
8. Remove the temporary adhesive, flip the cardstock and decide what paper to use for the last triangle (the iris). Cut a piece of paper large enough to cover the iris and adhere it from the back
8. Cut a piece of cardstock large enough to cover the mess and adhere it to the back of the project.
9. Flip it over and admire.
10. Cut out a cat head from a piece of cardstock (I made a template for my daughter to use) and attach a pipe cleaner tail. You are done!
Notes: I made this project with my 8 years old daughter. I cut the opening and attached the cardstock to the template. She chose the paper, cut the paper stripes, built the key (with my help) and completed the project. She decided to make a face for her cat and than she added the paws, the fish and the trash can :)

In a similar way I used an oval shape and a square iris folding template to make a witch hat


Hope it is clear enough. Post your questions in the comments :)

Saturday, April 18, 2009

Scraps!

I store my paper scraps in 12x12 drawers sorted by colors - white/cream/grey/black, pink/red/purple, yellow/orange/brown, blue/green, special paper, multicolor. I love my scrap drawers and use them all the time. Last month I did two projects with Ella using only the scraps. The projects were for the Fiskateer message board.
The first project is the corner bookmark. I first saw this idea in the kids craft book long time ago but recently it appeared again in the blog universe. After few hours of cutting, gluing and punching we had enough bookmarks for all our family members and friends.
Here is how to make a circle bookmark.

For the second project we made collage animals.

1. Print out animal shapes and find few scraps of pattern paper

2. Tear the paper into the small pieces

3. Use glue stick to cover the animal shape, don't worry about going outside the shape

4. Here is how the covered shape will look like

5. Flip the paper and cut out the shape. I did it just by holding the sheet of paper in my hand. You can use a light box to trace the shape on the back side or even trace the shape before you cover it.

6. Play with different shapes and textures.

To find the animal shapes I just googled for "animal silhouettes". Martha Stewart has great templates on her website. I used some from this website. http://karenswhimsy.com/animal-silhouettes.shtm

Because the shapes are solid it was easy to cut them out by just flipping the paper and holding it in hand. You can cut the shape before building the collage or you can trace the shape on the back of the paper.

We made 9 cats (my daughter made 3 and I made the rest). I bought a very inexpensive frame at Michaels, cut out the letters with my Revolution and made this poster. I will hang it in Eli's room (when he will have a room LOL)

Oh, and the most exciting thing? I finally used the scraps of the purple Chuck E. Cheese paper! I think it was one of the first patterned papers I ever bought LOL
Posted by Picasa

Monday, November 17, 2008

My big girl is 10. Smart, responsible, sensitive, loving sister to Ella and Eli. That's my girl.


And if I am on the bragging wagon here is something else. Few days ago I was working on this card.


Ella saw me and said that we also wants to make a card. Here us what she made. I only helped to make a bow. She picked the paper and did everything else. I am one proud mama :)