Wednesday, November 28, 2012

Glittery lights


Here is something quick for the coming Hanukkah holiday. "Yotzot mehakavim" (Israeli challenge blog) challenged it's readers to use adhesive tape and glitter. This is pretty much all I used to make this card. I used American Crafts 1/4" adhesive tape for the candles and 1/2" tape to cut out the flames. My Fiskars titanium non-stick scissors came very handy in cutting out those small and sticky pieces. 


That's how it looked in process. The white glitter was from one on the very old Jo-Ann kits and the gold glitter is by Martha Stewart. It is called Florentine Gold and is super sparkly. The black backgroud is a recycled catalog. The sentiment is cut with Silhouette. Hebrew letter are no good candidates for welding so I attached them to a thin bar. The sentiment says "Happy holiday of lights"


Supplies: cardstock (American Crafts), glitter (Jo-Ann, Marta Stewart). Silhouette Cameo

Sunday, November 25, 2012

Diva at Bar Louie


The photo of my Diva martini was printed and was hanging on my bulletin board together with the small menu booklet I took from the restaurant. They both now live in my scrapbook, thanks to the sketch from Love My Tapes blog, lovely paper from Amy Tangerine  and my new favorite toy - Silhouette Cameo.

Supplies: cardstock (American Crafts), patterned paper, thickers, stickers (Amy Tangerine for American Crafts), chipboard letters (Basic Grey), fabric tab(K&Co), washi tape (Love My Tapes), jewel (Doodlebug), arrows (Silhouette Cameo)

The photo was taken with my phone so it is not the best but I still like it since it brings nice memories. I cut out a piece from the menu booklet and also the restaurant logo from the booklet cover. I love using washi tape as a base for embellishments cluster or the title. It ties everything together.

I was able to cut the arrows from the back side of the manufacturer strip and match the color of the arrows to the thickers! Fun! 


On the other note, I am happy for the long weekend to be over. This mama needs some quiet time....

Saturday, November 24, 2012

Snowflakes galore


I made these holiday tags few days ago when we still had this unseasonably warm weather. 60s on Thanksgiving in Wisconsin?? Who would thought that? But yesterday and today the temperatures we back into lower 30s and the snowflakes on my tags suddenly look very appropriate. 

Bo Bunny November card challenge is to make a tag. I still had some Midnight Frost scraps from 2 years ago. I took them out and went to work.

Supplies: patterned paper (Bo Bunny), ribbon (Bo bunny), stamp(Whipper Snapper Designs), glitter Galze (Li'l Davis), ink (Clearsnap), jewel (Doodlebug), twine (unknown)

I stamped the ice skates image on white cardstock, cut it out and covered with a layer of Glitter Glaze. The Bo Bunny pleated ribbon was perfect for making a rosette. The big snowflake is cut with Silhouette using the design from the Silhouette store. It took me few tries till I was happy with the size.

I created the Happy Holidays sentiment in the Silhouette Studio software by typing each letter separately and welding them together. It cuts as one piece! If you didn't notice before I am pretty excited about my Silhouette and what I can do with it! Silhouette 101 class with Amanda Jones that just ended, was really helpful in motivating me to start using it right away. I can't wait to learn more! 

I finished with some twine and tiny jewel as a dot on i.
The tags will be perfect for Lila's ice skating coaches.

After making the tags I was left with few cut snowflakes that were too small for the tags. They were too cute to be thrown away and I decided to make a layout. This layout is based on the PageMaps sketch. The tag is another shape from the Silhouette store that I modified for my needs.

Supplies: cardstock (American Crafts), patterned paper (Bo Bunny and Basic Grey), ribbon (Bo Bunny), jewels (Bo Bunny), thickers (American Crafts), letter stickers (Bo Bunny), border sticker (Bo Bunny), washi tape (Love My Tapes), snowflake stickers (EK Success), stickles (Ranger), heart punch (Fiskars), corner punch (Fiskars), Silhouette Cameo, colored pencils


To make the hearts I covered a piece of white cardstock with washi tape and punched out the hearts with Fiskars squeeze punch.

I added blue and silver stickles to the snowflakes for extra sparkle.

I have less than one sheet of paper and some ribbon and stickers left from this collection. Should I let them go or should I make something else? Hmmm

Saturday, November 17, 2012

Thanks - Silhouette card number 2


Supplies: grey cardstock (Core'dinations), gllitter cardstock (Recollections), white cardstock (American Crafts), letter stickers (EK Success), Silhouette Cameo

I needed to find a home to the white "thanks" cut. I made it for the previous card but decided to go with red instead. That's how this card was born. I made a star template in the Silhouette Studio and cut it from a thin chipboard. I placed the template under the Core'dinations cardstock and went over with a sanding block. Little blue star is also cut with Silhouette.


I am afraid I am getting addicted...

Wednesday, November 14, 2012

Thanks - Silhouette card


Did I tell you already how I love my Silhouette?? It brings my scrapbooking to a completely different level. So many possibilities!

I made this card using "Thanks" shape from the Silhouette store and free doily cut files from Bird's Cards.


The background paper and the plastic flowers are from my old stash - Heidi Grace Valentine line. The jewels are by "K by Marcella". I picked the colors based on the inspiration image from the Israeli blog "Yotzot mehakavim". It is fun to try new color combinations that I wouldn't try otherwise.
 

Thursday, November 8, 2012

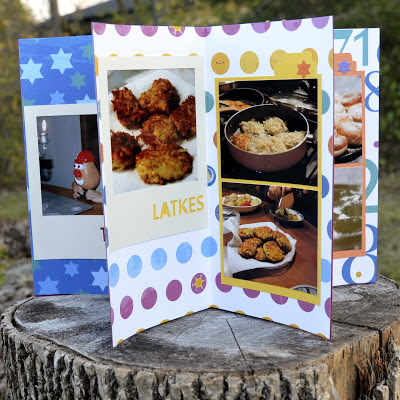
Hanukkah star album - guest post at D's Paper Studio

Debby from D's Paper Studio kindly invited me to write a guest post for her blog while she is celebrating the arrival of her new granddaughter. The blog post was up yesterday and I am reposting it here

When Debby asked me to write a guest post I knew I wanted to share a Hanukkah project. We take a lot of pictures during the eight days of Hanukkah - pictures of food, gifts, people, menorahs and more food. My favorites are pictures of candles. There is something magical in looking at the flickering candle fire. That is one of those rare moments when I feel connected to my ancestors.

After giving it some thought I decided to make a mini book, but not just any mini book - a star mini book. Years ago I took a class from Big Picture Classes (Big Picture Scrapbooking at that time) By Tena Sprenger. The class project was a hand sewn star mini book. I made one with pictures of my babies and it is one of my most favorite mini albums. I decided to make another star minibook  with some changes.


The original book is 6x6 and has 7 signatures. I made it 6x9 to include more pictures (did I say that I have a lot of pictures?) and used only 6 signatures. My star has 6 points like the Star of David.

I used three colors of Core'dinations cardstock for the book signatures that are hand sewn with waxed cotton thread. The patterned paper is from Hanukkah collection by Crafting Jewish Style.

For the cover I chose the patterned paper with an image of the Hanukkah Menorah and just added the title. The letters are Heidi Swapp invisible stickers lightly brushed with gold mist and the numbers are American Craft Thickers, of course. I added distress stickles in Antique Linen to the candle flames to make it a little more festive.


Here is how the album looks closed with all it's sewn signatures stacked neatly.


For the inside of the album I went with very simple design - one picture on the left in the Polaroid frame, two pictures of the right matted with coordinating cardstock.

I designed the Polaroid frames in Silhouette Studio software and cut them with my brand new Silhouette Cameo! Let me know if you are interested in the cut files, I will gladly email them to you.

The patterned paper is so bright and colorful that I didn't feel it needs anything else. The only embellishment is the file tab with a small Star of David sticker.


Small binder clip is holding the book covers together when the book is open.

For the next six weeks this book is going to live in our living room, reminding us about great time spent together with family and friends.

I can't wait to make new memories and take even more pictures this year. Five weeks till Hanukkah!

I wish you all happy and festive holiday season! 

That's was it. What do you think? I had so much fun designing these little frames in Silhouette Studio. I can't wait to do more and constantly planning other projects! Anyone else addicted to Silhouette??

Tuesday, November 6, 2012

Hello Kitty Halloween


Another Halloween layout. Lila dressed as Hello Kitty at Wisconsin Edge Halloween party. That costume was so short that I made another pink tulle underskirt for her. It was perfect for the ice skating party.

Supplies: patterned paper, stickers(Sandy Lion), cardstock (American Crafts), doily (Michael's), jewel flourishes (Recollections), stamps (Making Memories)


I had fun stamping these cute bats in pink and making Halloween layout without any orange involved.


P.S. Remember the fall wreath card? It won the Bo Bunny blog challenge! I am so excited! I am glad I didn't give up on that wreath ;-)

Monday, November 5, 2012

Happy Haunting

Another Halloween layout using the DCWV Be Witched stack. I added fancy border punched with Martha Stewart spider web punch and two funny bats from the K&Company embellishment pack. Super simple this time.


Supplies: patterned paper (Die Cuts With a View), cardstock (unknown), border punch (Martha Stewart), corner punch (Fiskars), bats (K&Company)


As you can see I am still scrapping 2009 pictures. Did you scrap this year pictures already? My kids had very bright costumes this year with reds and blues so I can't decide what paper to use. Any recommendations?

Saturday, November 3, 2012

Scrap It Girl November challenge


New month and new challenge at Scrap It Girl. This month we were challenged to use a tree. I used one of the papers from the DCVW Halloween stack. I absolutely love these pictures of Ella in leopard costume. She loves all cats, big and small and definitely have something feline in her personality.

Supplies: patterned paper (DCWV), letter stickers (American Crafts. Doodlebug), bat stickers (Making Memories), black cardstock (unknown), stickles (Tim Holtz), Silhouette Cameo

I covered the tree with generous layer of black stickles. It looks really cool in real life.

And here it is - this cute black cat is my first Silhouette cut that I used on a layout.  My baby arrived last week and this week I started Silhouette 101 class by Amanda Jones. I am in love this machine! I am pretty sure I will be using it a lot!


Come play along with us!  You may enter two projects of any kind, as long as they are new projects, and you use a tree.

Thursday, November 1, 2012

Feeling pretty


I made this layout for an online crop at My Scraps & More. I had to use 2 pictures, polka dot paper, die-cut, journaling and ink. I had to go to Michael's to find the polka dot paper. I wanted black with white polka dots to match one of the girl's belt. Everything else is from my stash, specifically from one of the very old Jenni Bowlin kits. When I say old I mean it, I think it's 2008. But who cares? I love how it turned out!

Supplies: patterned paper (Anna Griffin, Recollections), letter stickers (Bella Blvd, American Crafts), doily die (My Favorite Things), overlays (Hambly Prints), raindots (Cloud 9), ink (Tim Holtz)

I cut out two frames from Hambly transparency and layered them under the title and the date.

You would think that it is time to let this kit go, but no, I carefully gathered all the scraps and put them back into the envelope. I can probably make another layout or two ;-)